Wednesday, January 23, 2013

We've Got The Groovy Tapestries

Batik Sun

Red Palm

Blue and Purple Dominoes
Medallion
Rustic Flower
Batik Ohm

Batik Buddha

Batik Ganesh

Dancing Shiva

Eyes of Buddha

Fish Harvest

Velvet Hand Painted Ganesh

Our tapestries will help you keep your home as warm and inviting as your heart. 
<3 Om Shanti <3

Get The Look: Janis Joplin


image from wikia
In the 60's, Janis Joplin busted out on the music scene with a voice and look completely her own. She wasn't the cookie-cutter image of a beautiful and delicate young woman that we had been so used to. Her fashion sense was so awesome, so unique, that we find ourselves getting inspired by her looks all the time. 
Get the Look: Janis Joplin
Get the big bell sleeves in this blouse.
Layer your blouse with this velvet jacket.
 Get groovy and layer your other necklace with this acai seed one.
Can't forget the hip hugging bell bottoms!
Feeling groovy yet?

Newly Added One of A Kind Items

image from reciprocityimages
We are so excited to have a collection of one of a kind items from the Shipibo tribe of the Peruvian rain forest. The ritual process of embroidery is considered sacred among the tribe and these handmade pieces showcase the beautiful work and vision of these talented individuals.

This gorgeous sacred cloth full of intricate embroidery could be used as a table cover or wall hanging...it's perfect to place sacred items upon.
We've got several amazing bags full of colorful and fun embroidery work, this slouchy shoulder bag being one of our very favorites.
How could you not feel groovy wearing this awesome tank top?

Check out all of the new items at the One of A Kind Collection section of our website.
 
Much love from your friends at Blue Sky <3

Namaste Quinoa


This is a dish that we make about once a week and then have leftovers and side dishes that are ready for us to eat on the go. Quinoa is an essential part of our diet because it is a complete protein, and once you add all the yummy veggies you've got a pretty balanced vegan meal to nourish yourself. We recommend going organic wherever possible, and to substitute vegetables that are in season if you're feeling creative. This recipe makes about 6 servings.
Ingredients:
1 1/2 cup dry quinoa
5 cloves garlic, minced
1/2 of a large red onion, chopped
1 red pepper, chopped
3 medium sized carrots, chopped
1 zucchini, chopped
1 cup of cooked corn
15 or so grape or cherry tomatoes, cut in 1/4ths
1/4 cup fresh basil, chopped
1/4 cup fresh parsley, chopped
1/4 cup fresh cilantro, chopped
3 Tbsp Bragg's Liquid Aminos (soy sauce can be substituted but Bragg's is better)
4 Tbsp Extra Virgin Olive Oil
2 tsp ground cumin
Salt and Pepper to taste
Combine 3 cups water with quinoa in a sauce pan with a tight fitting lid. Bring to boil, stir once, reduce heat to low and replace lid. Set your timer for 15 minutes and do not open the lid, as the steam is what is cooking the quinoa. Once your timer goes off, remove from heat, fluff with fork and replace lid for 10 minutes. Remove lid and set aside.
While your quinoa is cooking you can begin to sauté garlic, onion, red pepper, carrot and zucchini in olive oil in a large skillet over medium heat, stirring occasionally. Once the carrot doesn't crunch when you bite into it, but isn't soft (about 12 minutes) add basil, cilantro, parsley, corn, tomato and cumin. Cook for an additional minute with the new ingredients.
Add cooked quinoa and Bragg's to skillet (or to a big mixing bowl if your skillet isn't going to hold everything.) Add a little salt and pepper to taste and stir well. Garnish with a sprig of parsley and enjoy. If you serve your yummy creation on a blue plate then you have every color of the rainbow!!

Ben and Jerry's Ice Cream

image from sfweekly
We love when successful businesses use their power to help make a difference in the world. Ben and Jerry's ice cream has always been one of our favorite tasty treats, but our love for them goes beyond the ice cream. Ben and Jerry moved to Burlington, VT in 1978 because it was a college town with no ice cream parlor, they figured no competition would help their business blossom. The pair held social and political events at their store aimed at the college crowd, and business began to boom. In 1980, they began packaging their ice cream for sale in a stores. Once Ben and Jerry began to taste success, they did the unthinkable for young businessmen...they held a public auction of the company's stocks in Vermont. Their idea was for their community to 'get a taste of the action,' as their business was beginning to succeed as well as gaining capital to invest in more equipment for producing ice cream. In 1984, Häagen-Dazs tried to limit Ben and Jerry's distribution by threatening to pull their product out of any store that would carry Ben and Jerry's. As you can imagine, this did not settle with the pair. They immediately launched the "What's the Doughboy Afraid of Campaign?" and became the faces of the little guys getting squashed by big business. The media storm that followed helped the pair gain recognition not only because of the Häagen-Dazs ordeal, but also allowed them to share their important philosophies and ideologies of how a business should be run.  In 1985 the Ben and Jerry Foundation was created and received 7.5% of their annual pre-tax profits to go towards community oriented projects. In 2000 the pair sold the company to food giant Unilever under one condition, to keep going with their mission to give back to the community through the Ben and Jerry's Foundation, as well as sourcing all milk from Vermont cows. Though they don't oversee the company anymore, Ben and Jerry are both active in the Ben and Jerry Foundation. Ben lobbies in Washington to increase funds for education by taking a minuscule amount of funding from the military. He uses cookies to demonstrate how much funding the military is getting vs. how much funding education is getting.

Click here to see what Ben and Jerry are fighting for these days and what you can do to help. What's your favorite flavor of Ben and Jerry's? We like Phish Food, but you probably already knew that! :)
Make Your Own Prayer Flags


We love to donate our old clothes to charity because it makes us feel so good! But every once in a while there's a textile that we love so much we can't say goodbye. While spring cleaning we found this old Blue Sky skirt that's just too big for us, but we weren't quite ready to get rid of it yet.
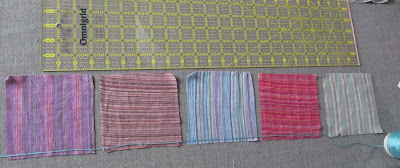
So we're looking at it and trying to think about how to utilize the five colors, and it hits us...prayer flags! We've been wanting to make prayer flags with our own hands so they're just that much more special and this skirt seemed like the perfect item to up-cycle. This tutorial doesn't involve a sewing machine, all you need is an old garment, a seam ripper, a ruler, scissors, hot glue and hot glue gun, and some string. Find a woven cotton garment that you want to use, any colors and patterns you're drawn to will work. The only thing we recommend is no stretchy fabrics, so tee-shirts are out. Please note that it is possible to work with knits, but it's going to require a LOT more work, so we'd stick with a woven. The most time consuming part of this project is deconstructing your garment, we watched movies while we removed our seams over a couple days so it wasn't as overwhelming as doing it in one sitting. 
After you've got your garment deconstructed your next step is to iron the heck out of your fabric. You want it to be as flat as possible. Once it's ironed, you can cut out 5" by 5" squares of your fabrics. We did 8 of each color and are going to put them in color order to more closely resemble traditional prayer flags, but there is room for creativity. We love the idea of each square being a different print with no rhyme or reason too. Go with the flow, work with what you already have and something beautiful is sure to follow.
We have a hard time working in a space that isn't organized, so we like to set everything out and make it a little easier on ourselves. Grab 5 flags and lay them out in a straight line. Use a ruler to make sure everything is in order. We like the look of about a 1/2 an inch between flags. Next pick a yarn or string to use to connect your flags. We used an 8/2 cotton thread. Give yourself about a yard of slack before you start. This gives you a bit of leeway when you're hanging up your pretty new flags.
With your yard of slack hanging out to the left of your first flag, squirt a dot of hot glue onto the left corner and press the thread to the left and to the right of the glue so that the thread is smushed in there securely without you ever having to touch the hot glue. Continue to do this in the middle of the square as well as the right side of the square, so that each flag is connected to the string in 3 places. Make sure that from each dot of glue to the next that your string is taut. This will help your flags to lay beautifully once they're hung.
Continue all the way down the line. Once you glue the last flag of that row, move them to left and start another row and continue the process until all of your squares are gone.
Hang with thumbtacks wherever you please and enjoy your good fortune. To get this look, pair with a Blue Sky tapestry. And yes, that IS a print of Fishman playing a vacuum cleaner on the right. :)

From Egg Carton to Jewelry Organizer

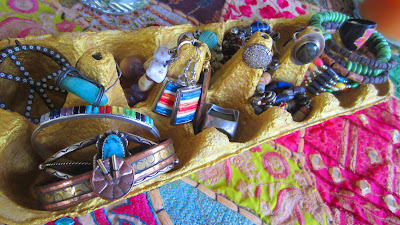
We love recycling everyday items into new, more exciting everyday items! This easy and fun tutorial shows you how to turn an old egg carton into a groovy jewelry holder. All you need is an egg carton of any size, paint of whatever color you like best, a paintbrush and some super funky jewels. Don't have any awesome jewelry? Check out our Seeds of Change line, a portion of proceeds goes to benefit the Amazon Rain Forest...how awesome is that?!
Start with a regular old egg carton.
Remove the top of the carton and the flap used to secure the top closed, leaving just the bottom tray where the eggs sit.
We picked a metallic gold paint and a fairly small brush to paint with, but the color is all up to you.
Cover the carton in a layer of paint, making sure to get into all the crevasses of the egg carton.
Let your carton dry and after that you can load it up with all your favorite jewelry, utilizing the support system built for the transporting of delicate eggs.
Love the tablecloth we used? It's our Special Wall Hanging! <3

Back Woods Back Packs

  At Blue Sky we LOVE doing adventurous things so we are always carrying around a groovy backpack filled with all the necessities. We spotted this awesome Blue Sky backpack while biking around Hilton Head Island, SC on the beautiful Lizzy who was so sweet to let us take a few pictures.

This mini backpack is ideal for traveling. Its' compact size doesn't weigh you down when you're on the go, but we can't promise people won't be stopping you to let you know how awesome it is!
Check out our full selection of backpacks here, pick one up and start getting funky! <3

DIY Complexion Mist

DIY Complexion Mist

We love keeping our skin clean and hydrated, but we just can't stand using harsh chemicals! All of our products were getting bulky for traveling and we started thinking maybe there is a way to combine all of the oils we just can't live without into a daily, all-in-one face regimen. We needed something that didn't involve cotton balls or q-tips for when we are on the go, so what better than a face spray! We are hooked, our friends are hooked, you should get hooked too!
1 part diluted Tea Tree Oil (mix 1 part tea tree oil to 1 part filtered water) - Tea tree oil is great for blemishes and acts as a natural antibacterial disinfectant, but because it's an oil, it doesn't leave your skin dry.
1 part Vitamin E oil - Vitamin E oil is an amazing moisturizer. It is light weight which keeps it from clogging pores. Like aloe, it is great for after the sun when skin is left dried out.
1 part Witch Hazel (make sure not to get a witch hazel that has been mixed with alcohol, which is very common!) Witch hazel is a gentle astringent. Like the tea tree oil, it reduces bacteria on the face to help prevent the formation of blemishes.
1 part filtered water.
Combine these 4 ingredients (don't forget to dilute your tea tree oil!) in a spray bottle, and shake before every use to mix the oil and water. Spray 3-4 times on face and neck, and rub in any excess into your skin. Put it in the fridge in the summer for a refreshing complexion mist to hydrate your sun-kissed skin while cooling you off. Throw in your bag and take it to a festival for a very low maintenance way to stay as beautiful on the outside as you are on the inside. <3
Get the pants here.

Get The Look: Donna Pinciotti

image from googleimages

Ever wake up and think to yourself, "Today I need to look more like Hot Donna from That 70's Show?" Well, not to fear, we can help you get that look!
Bell Bottom Pants are a must!
You've got to have a loose fitting blouse with embroidered detail.
Top off the look with a matching bag, and you're looking pretty groovy!


The Art of Amanda Sage

At Blue Sky we are artists and students. We study truth and its' deep meaningful effect on our souls as well as the universe. Amanda Sage shares that same sentiment. Her visionary pieces focus on the feminine mystique and collective unconsciousness of our world. Amanda hails from Denver, CO but has spent time all over the globe, currently practicing in Vienna. Though her main studio is based in Los Angeles, Amanda can be seen at live painting at music festivals and exhibiting her work in galleries with other visionary artists.

image from amandasage.com
'Mars' is a beautiful display of a fierce goddess. The color and line work in the piece keep the eye moving throughout the image. This piece seems simple compared to Amanda's later work, yet still has the fundamental pieces that make 'Mars' very much her own.
image from amandasage.com
'Illuminance' is an impressionist piece that so beautifully captures the essence of a goddess. Her cascading rows of color once again keep the eye moving throughout the entire piece, constantly intrigued.
image from amandasage.com
 2010's 'Daughter of the Divine Flow' marks an exciting time. The previous two images (the first from 2008 and second from 2009) display beautiful craftsmanship and technique, but around the era of 'Daughter of the Divine Flow' it seems that Amanda really began combining and layering the techniques that make her so unique, in turn creating a much more resolved and mature body of work that we just can't get enough of.
image from amandasage.com
'Limbic Resonance' is a beautiful display of the force fields connecting us to ourselves, each other, and the universe. From the background of the planet all the way to the flowers in the woman's hair, every element is so carefully executed, making not only a piece that is aesthetically pleasing, but conceptually stimulating as well.
image from amandasage.com
2012's 'Spirit' brings us to Amanda's most recent collection. We are reminded of so many different things when we view this piece. Most notably would be the Egyptian collar reference on the neck of the spirit, as well as the Black Rock City, Nevada landscape.


We encourage you to check out her website here to view some more of her work. Make Art Not War!